本文尝试回答几个问题。
- CALayer 是什么
- drawRect 和 CALayer 的关系
- 一个视图是如何渲染到屏幕上的?
# 视图的基本展示单元 CALayer
我们在 iOS 日常开发用到的最常用的视图控件就是 UIView。大多数开发者也知道 UIView 是对 CALayer 的一次封装,CALayer 属性才是真正的控制展示的部分。对 UIView 来说,我们操作 UIView 的 backgroudColor 之类的属性,其实本质上是对 CALayer 的操作,CALayer 管理着所有可视化内容的选项。
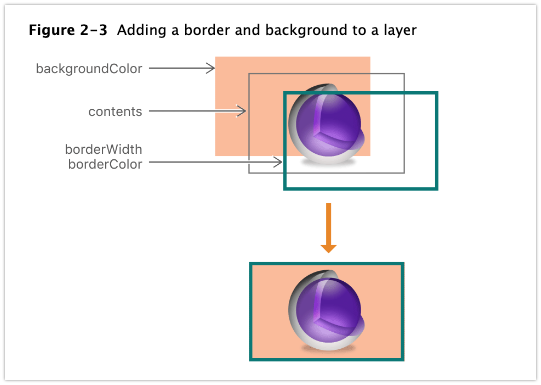
CALayer 中有一个属性是 contents,官方对它的解释是「An object that provides the contents of the layer. Animatable.」也就是说 contents 包含着你想要呈现的内容的位图信息。
但是 backgroundColor 和 contents 可不是一个东西,可以看官方文档 (opens new window)中的 CALayer 的组成图,backgroundColor 是在 contents 后面,borderWidth 和 borderColor 是在前面。
给 contents 提供内容有主要有两种方式
如果我们只使用
CALayer去做呈现的话,可以直接给contents提供视图内容去进行展示,比如使用如下方式可以直接设置图片let layer = CALayer() layer.contents = UIImage.init(named: "Monosnap")?.cgImage设置 layer 的绘制代理。比如我们最常用的
UIView-CALayer这种展示方式,UIView是实现了CALayerDelegate协议的,也是通过实现这个协议方法来给CALayer提供展示用的内容,即提供展示信息给contents属性。这个contents属性被称为「寄宿图」。
我们日常最常用的就是后者,所以也将重点放在后面。
# UIView 的 drawRect 和 CALayer
关于 drawRect: (opens new window) 它其实没有默认实现。当子类继承 UIView 想要提供自己的绘制方法的时候,也不需要调用父类的绘制方法,而是自己实现 drawRect: 方法,提供绘制实现,本质上就是给 CALayer 的 contents 提供要显示的内容。
当调用 drawRect: 方法的时候,UIKit 已视图配置了适当的绘图上下文,可以通过 UIGraphicsGetCurrentContext 函数获取对上下文的引用,比如可以使用如下代码,在自定义子视图上画一条横线。
override func draw(_ rect: CGRect) {
    let context:CGContext? = UIGraphicsGetCurrentContext()
    context?.setLineWidth(10)
    context?.setStrokeColor(UIColor.green.cgColor)
    context?.move(to: CGPoint.init(x: 50, y: 50))
    context?.addLine(to: CGPoint.init(x: 100, y: 100))
    context?.strokePath()
}
其实系统的很多控件也是通过 drawRect: 方法来实现绘制的,比如 UILabel,尽管没有反编译 UIKit 的代码,但是通过继承 UILabel 得到子视图,实现一个空的 drawRect: 方法,UILabel 就不会再正常展示文字了,所以可以推断原始的 UILabel drawRect: 方法中有对应文字绘制的实现。
关于 drawRect: 引起内存「暴涨」的说法,很多是源于这篇「内存恶鬼drawRect (opens new window)」的讨论。我自己的看法是,是当 UIView 识别到 drawRect: 存在的时候,系统确实会分配一片内存用来进行绘制,这块儿内存的大小就是视图大小乘以 contentsScale ,所以如果我们的视图不需要定制绘制的时候,就没必要再图层子类里面保留空的 drawRect: 方法,白白让系统浪费内存。但确实需要定制绘制的情况下,当然可以实现 drawRect: 进行绘制。毕竟刚才也说了,很多系统控件也是通过 drawRect: 来进行绘制的。同时应该注意绘制的 CoreGraphics 是使用 CPU 资源进行图像绘制的,所以绘制过程应该尽量不要太重,否则可能会导致主线程的卡顿(参考 Use Asynchronous Layer Rendering As Needed (opens new window))。
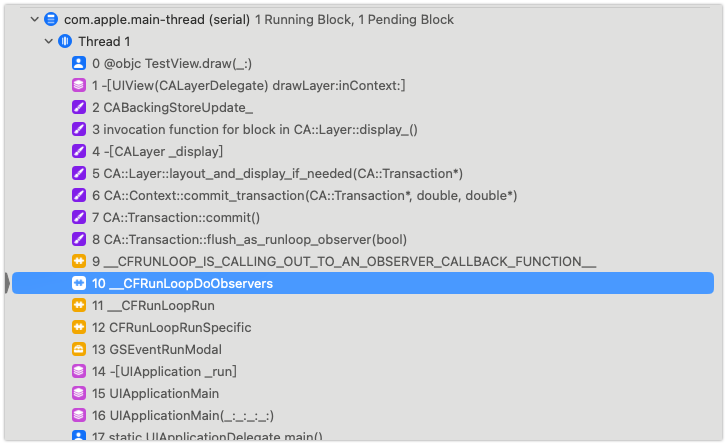
drawRect: 方法是使用 CoreGraphics 进行的图像绘制,当我们在 drawRect: 方法里打断点的时候会看到如下调用栈:
PS: Core Graphics (opens new window) 框架是基于 Quartz2D 绘图引擎的。
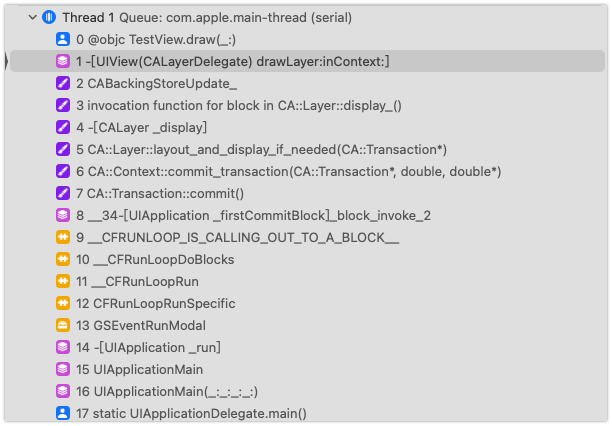
尝试分析一下这个调用栈来思考 drawRect: 绘制的内容是如何给到 CALayer'contents 属性的。
Runloop 区域就先不分析了,CA::Transaction::commit() 中关键 API 是 CATransaction。
CATransaction 是 Core Animation 中的事务类,负责批量的把多个对图层树(layer-tree)的修改作为一个原子更新到渲染树。
这里也暂时先略过,然后我们看到 CALayer 的 display 方法,官方说明是刷新 layer.contents 的内容。这个方法的说明 (opens new window)有点意思
- 如果代理对象(即UIView)实现了
CALayerDelegate协议中display(_ layer:)方法的话,则会调用此方法,让代理对象直接更新 layer.contents 属性, - 如果代理对象没有实现这个方法的话,则 display 会创建一个后备存储区域(backing store) ,同时触发
CALayerDelegate协议的另外-(void)drawLayer:(CALayer *)layer inContext:(CGContextRef)ctx;方法调用。
我自己理解 UIView 是实现了后面的协议方法,这里的后备存储其实就是 CGContext 管理的, drawLayer:inContext: API 也把 CGContext 作为参数,通知 UIView 使用实现绘制流程,在后备存储上绘制完成之后,使用后备存储作为 CALayer 的 contents 属性内容。
我自己理解 CALayer 作为 CoreAnimation 框架中最重要的类,其实就是连接 UIView 和 CoreGraphics 的桥梁。
# 视图是如何渲染到屏幕上的
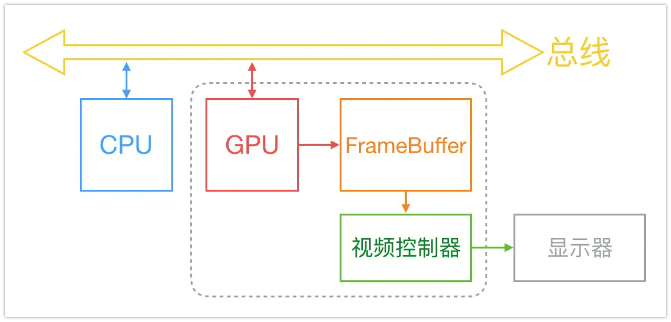
下图简要的描述了计算机渲染的流程
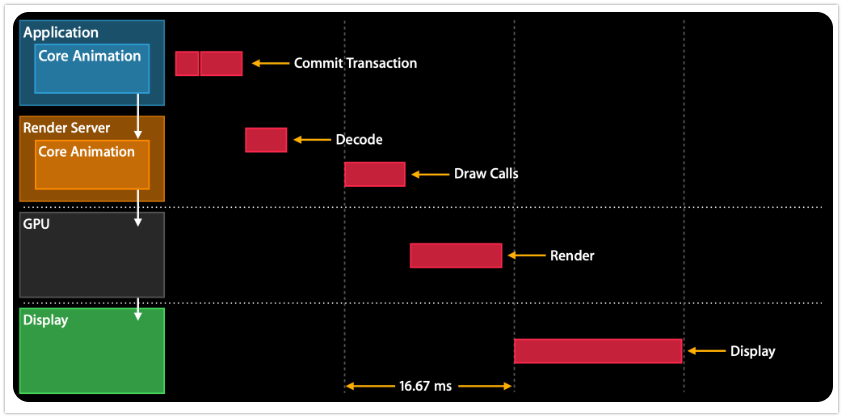
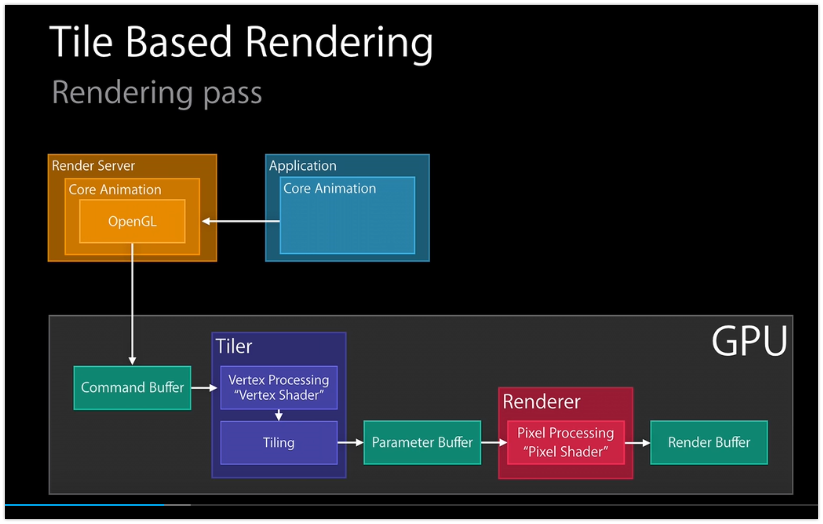
但是具体 iOS 里是什么样子呢?GPU 和 CoreAnimation 框架是如何协作的?总的流程大概是下面这个样子,来自 WWDC14:Advanced Graphics and Animations for iOS Apps (opens new window)
下面这张图是最新的 Video-Explore UI animation hitches and the render loop (opens new window) 官方视频的介绍,配合看可能会更好看一点。
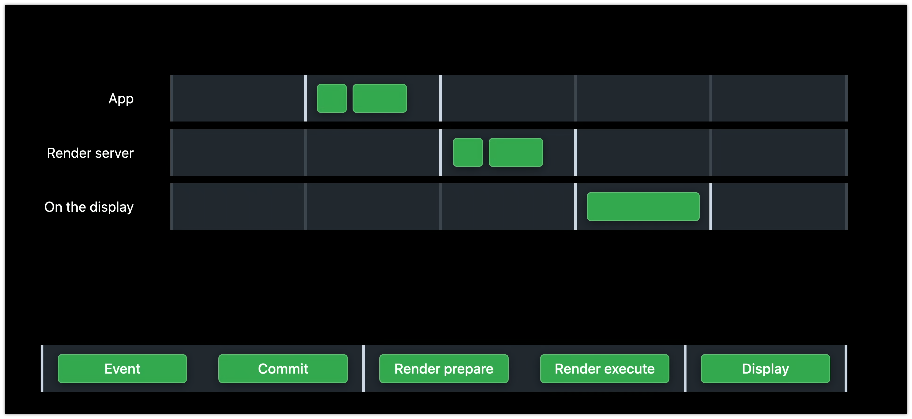
渲染循环有 5 个阶段
- 循环从第一阶段(事件阶段)开始。在这里,您的应用程序处理触摸事件并决定是否需要在 UI 中进行更改。接下来是提交阶段。
- 在提交阶段,您的应用程序更新其 UI 并将其提交到渲染服务器进行渲染。
- 在下一个 VSYNC 上,渲染服务器接受该提交,并在渲染准备阶段准备在 GPU 上进行绘制。
- 在渲染执行阶段,GPU 将您的 UI 绘制为最终图像。
- 再下一个 VSYNC 时,可以将帧显示给您的用户。
我们着重介绍提交阶段的内容,参考 WWDC 2014 -Advanced Graphics and Animations for iOS Apps,提交阶段又分为四个部分
- 1️⃣ Layout - Set up the views
- 2️⃣ Display - Draw the views
- 3️⃣ Prepare - Additional Core Animation work
- 4️⃣ Commit - Package up layers and send them to render server
PS: 这篇 WWDC 视频已经下架了,英文字幕在这里 (opens new window)。
详细说明一下提交阶段的这四个部分
Layout - Set up the views
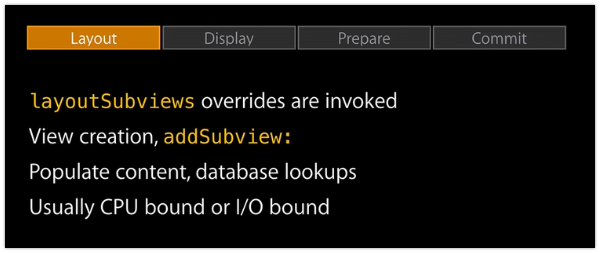
我觉得这张图容易让人歧义,好像视图创建的过程发生在视图布局之后,怎么会这样?这俩顺序颠倒一下是不是比较好。这部分是发生在 CPU 创建过程。
In the Layout phase the layoutSubviews overrides are invoked. This is where view creation happens. This is where we add layers to the view hierarchy with addSubview and this is where populate content and do some lightweight database lookups.
Display - Draw the views
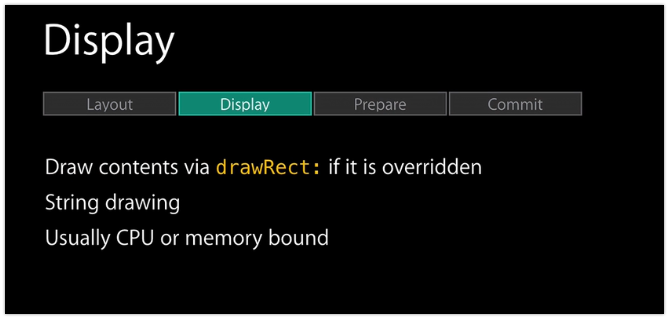
这阶段主要就是 drawRect: 在发挥作用了,而且我们之前也说过 drawRect: 主要是通过 CGContext 进行绘制,最终将绘制结果存储在一片通过 CALayer.contents 维护的内存里。这部分也是在占用 CPU 资源。
This is where the draw contents this drawRect if it’s overridden or do string drawing. One thing worth noting here is that this phase is actually CPU or memory bound, because the rendering is [inaudible]. We use here the core graphics for this rendering. And so we usually do this rendering with CG context.
Prepare - Additional Core Animation work
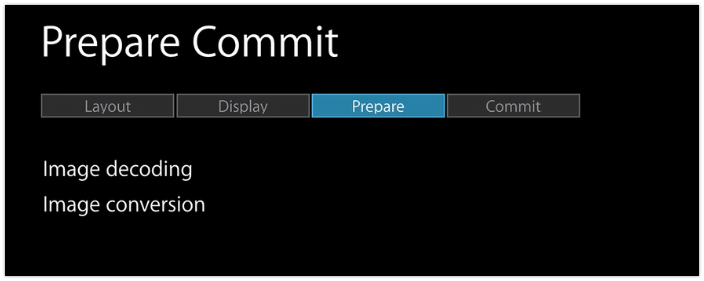
我理解这步骤除非是类似 UIImageView 这样的控件或者 CALayer.contents 属性直接指向了图片内容,否则一般的控件用不到图片解码。这步骤依然发生在 CPU 层面,原因是有的图片格式 GPU 不支持。
This is where image decoding and image conversion happens. This happens if you have any images and in your view hierarchy and these JPEGs or PNGs are getting decoded at this point. What happens here is that we might have images that are not supported by the GPU.
Commit - Package up layers and send them to render server
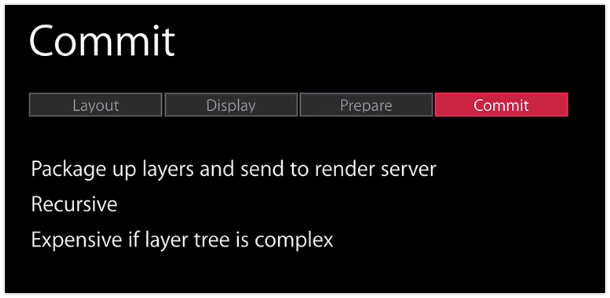
打包 layer 的内容然后发送给渲染服务。但是我很好奇这个打包过程是怎么发生的?理论上到这一步既然是递归打包,说明视图层级树上的所有视图都已经绘制完毕了。
In the last phase the Commit phase, we package up the layers and send them to the render server. This process is recursive. You have to reiterate over the whole layer tree and this is expensive.
跟我们日常应用密切相关的其实就是提交部分,CoreAnimation 框架负责了上述的提交流程,包括视图布局调用时机,以及控制 drawRect 绘制时机实际等等。
CoreAnimation 是如何知道这些调用时机的呢?这里就用到了 Runloop 相关的概念了。YY 大神在文章里是这么写的
当在操作 UI 时,比如改变了 Frame、更新了 UIView/CALayer 的层次时,或者手动调用了 UIView/CALayer 的 setNeedsLayout/setNeedsDisplay方法后,这个 UIView/CALayer 就被标记为待处理,并被提交到一个全局的容器去。
苹果注册了一个 Observer 监听 BeforeWaiting(即将进入休眠) 和 Exit (即将退出Loop) 事件,回调去执行一个很长的函数:
_ZN2CA11Transaction17observer_callbackEP19__CFRunLoopObservermPv()。这个函数里会遍历所有待处理的 UIView/CAlayer 以执行实际的绘制和调整,并更新 UI 界面。
我自己理解,应该就是 CoreAnimation 注册了两个 Runloop 的时机去做了对应的绘图和调整。当然官方说的很隐晦:
CATransaction 关于隐式提交的说明如下 Implicit transactions are created automatically when the layer tree is modified by a thread without an active transaction and are committed automatically when the thread's runloop next iterates.
我感觉 CA:Transaction:commit 这个过程就是对应上面提交阶段。
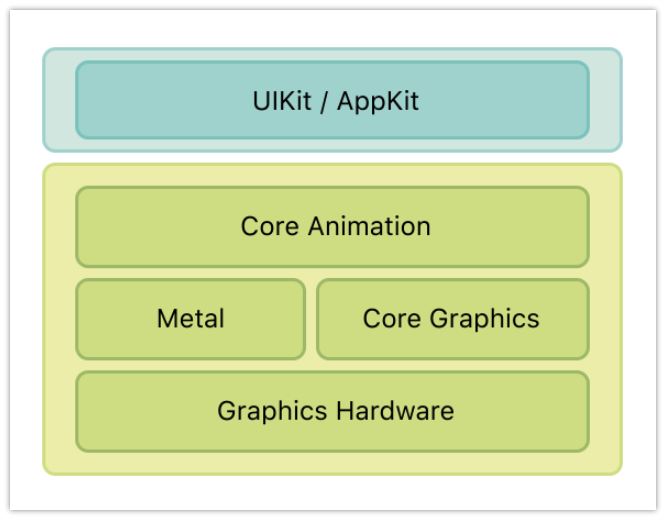
CoreAnimation 这个框架其实就是为上层 UIKit 创造了绘图的环境。UIKit 只管发命令,CoreGraphics 只管绘制,CoreAnimation 会负责协调绘制和更新过程。
CoreAnimation 最终发给渲染服务器的是它维护的图层树,渲染服务器会将图层树转换为实际的可显示图像。我自己感觉OpenGL 是将图层内容翻译为了 GPU 能识别的格式放到 Buffer 里面。
所以总结一下,视图层是如何渲染到屏幕上的,就是视图初始化填充完数据并布局完子视图之后,开启绘制,本质上是给 CALayer 的 contents 属性提供渲染内容,最后 CoreAnimation 将图层树打包发给渲染服务器,渲染服务器利用 OpenGL 提供的通道向 GPU 发送渲染指令。最终 GPU 完成渲染,将渲染结果发给帧缓冲器,随着垂直同步信号的到来,显示器从帧缓冲器中读取到图像,展示到屏幕上。
OpenGL 不太熟悉,渲染服务器的线性管道这部分知识盲区,不太明白 GPU 管道的含义,暂放一下。下图是一个渲染流程,浅贴一下, GPU 那块儿真的不熟…
以上如果有理解的不对的地方,欢迎指出来,有疑问也可以一起讨论一下
参考地址:
- 离屏渲染 (opens new window)
- ibireme-iOS 保持界面流畅的技巧 (opens new window)
- WWDC14:Advanced Graphics and Animations for iOS Apps (opens new window)
- Core Animation Programming Guide (opens new window)
- Quartz 2D Programming Guide (opens new window)
- iOS Core Animation: Advanced Techniques, Part 1: The Layer Beneath (opens new window) #drawRect: 分配内存图说明
- Core Animation(二) - 隐式动画、CATransaction与CAAction (opens new window)
- CALayer display API (opens new window)
- ObjcIO-绘制像素到屏幕上 (opens new window)
- Video-Explore UI animation hitches and the render loop (opens new window)
- Advanced Graphics and Animations for iOS Apps (opens new window)